Here I would like to share the steps of cracking linux password using John the Ripper.This information gained during my IT
Training in 2004.The training was actually on windows 2003 server, however, our trainer was keen enough to the additional knowledge of him
1. Download John-1.6.rpm or the latest version of it
2. install the package at the linux box
rpm -ivh John-1.6.rpm
3. cd /usr/local/bin/mypassword
Bookcafe

Sunday, May 22, 2011

Wednesday, April 20, 2011
3COMM Switch Training August 2007 - Install Driver Cable
<>Sys
[5500] Interface vlan1
[5500] ip address 192.168.10.1 255.255.255.0
[5500] q
Create User:
User-interface vty 0 4 <= com number
authentication-mode ?
authentication-mode scheme
q!
local-user admin
password simple123456
service-type ?
local-user admin
service-type telnet level 3
------------------------------------------------------
<5500> reset saved-configuration - > buat config yang lama
Save
[5500] Interface vlan1
[5500] ip address 192.168.10.1 255.255.255.0
[5500] q
Create User:
User-interface vty 0 4 <= com number
authentication-mode ?
authentication-mode scheme
q!
local-user admin
password simple123456
service-type ?
local-user admin
service-type telnet level 3
------------------------------------------------------
<5500> reset saved-configuration - > buat config yang lama
Save
Saturday, October 16, 2010
PHP Simple Image Gallery - The Success (Images Sorted In Table Manner)
As refer to my previous posting mission, I finally manage to create a simple image gallery and the most significant thing is that, images are sorted in table manner.
I used the arithmetics function MOD logic to help me to sort the images. In PHP, MOD can be represented as % and I used the MOD of $i+ % 5 since it will render incremental numbers i.e 1,2,3,4,5 and so on.
Number 5 will determine the number of column that you will get in your table. You can change this to other number such as 7 as long as the outcomes are 1,2,3,4,5 and so on.
The PHP codes are
I used the arithmetics function MOD logic to help me to sort the images. In PHP, MOD can be represented as % and I used the MOD of $i+ % 5 since it will render incremental numbers i.e 1,2,3,4,5 and so on.
Number 5 will determine the number of column that you will get in your table. You can change this to other number such as 7 as long as the outcomes are 1,2,3,4,5 and so on.
The PHP codes are
Sunday, September 26, 2010
PHP Simple Image Gallery
It is a very easy to create a simple image gallery using PHP script. What I mean is that I'm using a PHP function glob. This function will output the name of files in the folder. If this function can display the name of the files, then of course it should be able to display the files especially image files. I used the HTML tag <img src="" /> to display the image file and thus I created a very simple image gallery. The following is the PHP code:
Sunday, August 1, 2010
CakePhp : Three Basic Functions
From all my readings, I found out there are three basic codes for functions in CakePhp as to are to add, to edit and to delete data. The codes are all similar in all the books that I have read. All these functions are put into
models_controller.php files. //To save/add datafunction add()
{ if (!empty($this->data)) { $this->Modelname->create(); if(!!$this->Modelname->save($this->data)) { $this->Session->setFlash('Your data is Saved!', true); $this->redirect(array('action'=>'index')); } } }
Friday, May 21, 2010
JQuery : New Experience Part 2
I am still getting familiar with Jquery and the next experience that I would like to acquire is Jquery Plug-in : Treeview.
I took one example from one of my PHP Projects. The result of this Jquery plug-in is as follows:

As show above, I used the Treeview to build the side menus. When [+] is click, it will expand the sub menus as you can see at the Penyelenggaraan menu. This menu has three sub menus that are Profil, Tukar Katalaluan and Logout.
So now how I do it? It is actually rather simple, what need to do is to download the Jquery plug-in from http://bassistance.de/jquery-plugins/jquery-plugin-treeview/ . I used only the following files and images folder from the plug-ins that being downloaded.
I took one example from one of my PHP Projects. The result of this Jquery plug-in is as follows:
As show above, I used the Treeview to build the side menus. When [+] is click, it will expand the sub menus as you can see at the Penyelenggaraan menu. This menu has three sub menus that are Profil, Tukar Katalaluan and Logout.
So now how I do it? It is actually rather simple, what need to do is to download the Jquery plug-in from http://bassistance.de/jquery-plugins/jquery-plugin-treeview/ . I used only the following files and images folder from the plug-ins that being downloaded.
- jquery.treeview.css
- screen.css
- jquery.js
- jquery.treeview.js
- jquery.cookie.js
<html>
<head>
<meta http-equiv="Content-Language" content="en-us">
<meta name="GENERATOR" content="Microsoft FrontPage 5.0">
<meta name="ProgId" content="FrontPage.Editor.Document">
<meta http-equiv="Content-Type" content="text/html; charset=windows-1252">
<title>MENU</title>
<base target="main">
<link rel="stylesheet" href="js/jquery.treeview.css" />
<link rel="stylesheet" href="js/screen.css" />
<script src="js/jquery.js" type="text/javascript"></script>
<script src="js/jquery.treeview.js" type="text/javascript"></script>
<script src="js/jquery.cookie.js" type="text/javascript"></script>
</head>
<body>
<?php
echo "<font size=\"2\" face=\"Book Antiqua\">";
printf("Tarikh \n");
echo date("d-m-Y");
echo "<br>";
printf("Masa \n");
echo date("g:i A\n");
echo "</font><br><br>";
?>
<ul id="navigation">
<li><a href="?1">MENU</a>
<ul>
<li><?php
echo "<a href=\"javascript:top.parent.document.location.reload();\">";
?>
Muka Depan</a>
</li>
<li><?php
echo "<a href=\"askg.php?npelajar=".urlencode($nama4)."&idpelajar=".urlencode($nama5)."&idpelajar=".urlencode($nama6)."&kelaspelajar=".urlencode($nama5)."\">";
?>
Tanya Guru</a>
</li>
<li>
<?php
echo "<a href=\"askgxx.php?npelajar=".urlencode($nama4)."&idpelajar=".urlencode($nama5)."&idpelajar=".urlencode($nama6)."&kelaspelajar=".urlencode($nama5)."\">";
?>
Hantar Pesanan ke Pelajar Lain</a>
</li>
<li>
<?php
echo "<a href=\"http://www.smkagamainanam.edu.my/semaiweb/forum\">";
?>
Forum SEMAI</a>
</li>
</ul>
</li>
<li><a href="?2">PENYELENGGARAAN</a>
<ul>
<li><?php
echo "<a href=\"update.php?nama6=".urlencode($nama4)."&nama7=".urlencode($nama5)."\">";
?>
Profil</a>
</li>
<li>
<?php
echo "<a href=\"tukar.php?nama6=".urlencode($nama4)."&nama7=".urlencode($nama5)."\">";
?>
Tukar Katalaluan</a>
</li>
<li>
<?php echo "<a target=\"_top\" href=\"out.php\">Logout</a>"; ?>
</li>
</ul>
</li>
</body>
</html>
Wednesday, May 19, 2010
JQuery : A New Experience
I just bumped into JQuery and I found it very interesting. I think it will make my application more exciting and user-friendly. What you need is to download JQuery from jquery.com and jquery plug-ins. This JQuery will perform values validation and inform users to enter values into the text boxes and as a result users will enter correct values in the text boxes.
The following is example of Form Validation and the steps are:
1. Of course, you need to download JQuery from jquery.com and JQuery plug-ins from http://bassistance.de/jquery-plugins/
2. Create a htm or html file using notepad or html editor to your preferences. For me, I'm using Notepad++.
3. Make these codes in your htm or html files:
4. The files that are need to be included in the htm or html files namely jquery.js (download from jquery.com) and jquery.validate.js (jquery plug-ins downloaded from http://bassistance.de/jquery-plugins/ ) . Remember both files must reside inside the same folder as your htm or html file just now.
5. To run you file, just double click the htm/html file and then you will find out the astonashing result as shown below.
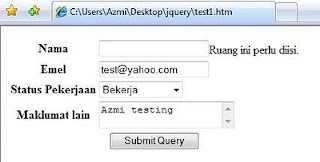
The following is example of Form Validation and the steps are:
1. Of course, you need to download JQuery from jquery.com and JQuery plug-ins from http://bassistance.de/jquery-plugins/
2. Create a htm or html file using notepad or html editor to your preferences. For me, I'm using Notepad++.
3. Make these codes in your htm or html files:
<html>
<head>
<script src="jquery.js" type="text/javascript"></script>
<script src="jquery.validate.js" type="text/javascript"></script>
<script>
$(document).ready(function(){
$('#contact_form').validate({
'rules':{
'name':'required',
'email':{
'required':true,
'email':true
},
'job_status':'required',
'comments':{
'required':true,
'minlength':10
}
}
});
});
</script>
</head>
<body>
<form id="contact_form">
<table>
<tr><th>Nama</th><td><input name="name" /></td></tr>
<tr><th>Emel</th><td><input name="email" /></td></tr>
<tr><th>Status Pekerjaan</th><td><select name="job_status">
<option value=""> -- Sila pilih-- </option>
<option>Tidak Bekerja</option>
<option>Bekerja</option>
<option>Bersara</option>
</select></td></tr>
<tr><th>Maklumat lain</th><td>
<textarea name="comments"></textarea>
</td></tr>
<tr><th colspan="2"><input type="submit" /></th></tr>
</table>
</form>
</body>
</html>
4. The files that are need to be included in the htm or html files namely jquery.js (download from jquery.com) and jquery.validate.js (jquery plug-ins downloaded from http://bassistance.de/jquery-plugins/ ) . Remember both files must reside inside the same folder as your htm or html file just now.
5. To run you file, just double click the htm/html file and then you will find out the astonashing result as shown below.

Subscribe to:
Posts (Atom)