As refer to my previous posting mission, I finally manage to create a simple image gallery and the most significant thing is that, images are sorted in table manner.
I used the arithmetics function MOD logic to help me to sort the images. In PHP, MOD can be represented as % and I used the MOD of $i+ % 5 since it will render incremental numbers i.e 1,2,3,4,5 and so on.
Number 5 will determine the number of column that you will get in your table. You can change this to other number such as 7 as long as the outcomes are 1,2,3,4,5 and so on.
The PHP codes are
Bookcafe

Saturday, October 16, 2010
Sunday, September 26, 2010
PHP Simple Image Gallery
It is a very easy to create a simple image gallery using PHP script. What I mean is that I'm using a PHP function glob. This function will output the name of files in the folder. If this function can display the name of the files, then of course it should be able to display the files especially image files. I used the HTML tag <img src="" /> to display the image file and thus I created a very simple image gallery. The following is the PHP code:
Sunday, August 1, 2010
CakePhp : Three Basic Functions
From all my readings, I found out there are three basic codes for functions in CakePhp as to are to add, to edit and to delete data. The codes are all similar in all the books that I have read. All these functions are put into
models_controller.php files. //To save/add datafunction add()
{ if (!empty($this->data)) { $this->Modelname->create(); if(!!$this->Modelname->save($this->data)) { $this->Session->setFlash('Your data is Saved!', true); $this->redirect(array('action'=>'index')); } } }
Friday, May 21, 2010
JQuery : New Experience Part 2
I am still getting familiar with Jquery and the next experience that I would like to acquire is Jquery Plug-in : Treeview.
I took one example from one of my PHP Projects. The result of this Jquery plug-in is as follows:

As show above, I used the Treeview to build the side menus. When [+] is click, it will expand the sub menus as you can see at the Penyelenggaraan menu. This menu has three sub menus that are Profil, Tukar Katalaluan and Logout.
So now how I do it? It is actually rather simple, what need to do is to download the Jquery plug-in from http://bassistance.de/jquery-plugins/jquery-plugin-treeview/ . I used only the following files and images folder from the plug-ins that being downloaded.
I took one example from one of my PHP Projects. The result of this Jquery plug-in is as follows:
As show above, I used the Treeview to build the side menus. When [+] is click, it will expand the sub menus as you can see at the Penyelenggaraan menu. This menu has three sub menus that are Profil, Tukar Katalaluan and Logout.
So now how I do it? It is actually rather simple, what need to do is to download the Jquery plug-in from http://bassistance.de/jquery-plugins/jquery-plugin-treeview/ . I used only the following files and images folder from the plug-ins that being downloaded.
- jquery.treeview.css
- screen.css
- jquery.js
- jquery.treeview.js
- jquery.cookie.js
<html>
<head>
<meta http-equiv="Content-Language" content="en-us">
<meta name="GENERATOR" content="Microsoft FrontPage 5.0">
<meta name="ProgId" content="FrontPage.Editor.Document">
<meta http-equiv="Content-Type" content="text/html; charset=windows-1252">
<title>MENU</title>
<base target="main">
<link rel="stylesheet" href="js/jquery.treeview.css" />
<link rel="stylesheet" href="js/screen.css" />
<script src="js/jquery.js" type="text/javascript"></script>
<script src="js/jquery.treeview.js" type="text/javascript"></script>
<script src="js/jquery.cookie.js" type="text/javascript"></script>
</head>
<body>
<?php
echo "<font size=\"2\" face=\"Book Antiqua\">";
printf("Tarikh \n");
echo date("d-m-Y");
echo "<br>";
printf("Masa \n");
echo date("g:i A\n");
echo "</font><br><br>";
?>
<ul id="navigation">
<li><a href="?1">MENU</a>
<ul>
<li><?php
echo "<a href=\"javascript:top.parent.document.location.reload();\">";
?>
Muka Depan</a>
</li>
<li><?php
echo "<a href=\"askg.php?npelajar=".urlencode($nama4)."&idpelajar=".urlencode($nama5)."&idpelajar=".urlencode($nama6)."&kelaspelajar=".urlencode($nama5)."\">";
?>
Tanya Guru</a>
</li>
<li>
<?php
echo "<a href=\"askgxx.php?npelajar=".urlencode($nama4)."&idpelajar=".urlencode($nama5)."&idpelajar=".urlencode($nama6)."&kelaspelajar=".urlencode($nama5)."\">";
?>
Hantar Pesanan ke Pelajar Lain</a>
</li>
<li>
<?php
echo "<a href=\"http://www.smkagamainanam.edu.my/semaiweb/forum\">";
?>
Forum SEMAI</a>
</li>
</ul>
</li>
<li><a href="?2">PENYELENGGARAAN</a>
<ul>
<li><?php
echo "<a href=\"update.php?nama6=".urlencode($nama4)."&nama7=".urlencode($nama5)."\">";
?>
Profil</a>
</li>
<li>
<?php
echo "<a href=\"tukar.php?nama6=".urlencode($nama4)."&nama7=".urlencode($nama5)."\">";
?>
Tukar Katalaluan</a>
</li>
<li>
<?php echo "<a target=\"_top\" href=\"out.php\">Logout</a>"; ?>
</li>
</ul>
</li>
</body>
</html>
Wednesday, May 19, 2010
JQuery : A New Experience
I just bumped into JQuery and I found it very interesting. I think it will make my application more exciting and user-friendly. What you need is to download JQuery from jquery.com and jquery plug-ins. This JQuery will perform values validation and inform users to enter values into the text boxes and as a result users will enter correct values in the text boxes.
The following is example of Form Validation and the steps are:
1. Of course, you need to download JQuery from jquery.com and JQuery plug-ins from http://bassistance.de/jquery-plugins/
2. Create a htm or html file using notepad or html editor to your preferences. For me, I'm using Notepad++.
3. Make these codes in your htm or html files:
4. The files that are need to be included in the htm or html files namely jquery.js (download from jquery.com) and jquery.validate.js (jquery plug-ins downloaded from http://bassistance.de/jquery-plugins/ ) . Remember both files must reside inside the same folder as your htm or html file just now.
5. To run you file, just double click the htm/html file and then you will find out the astonashing result as shown below.

The following is example of Form Validation and the steps are:
1. Of course, you need to download JQuery from jquery.com and JQuery plug-ins from http://bassistance.de/jquery-plugins/
2. Create a htm or html file using notepad or html editor to your preferences. For me, I'm using Notepad++.
3. Make these codes in your htm or html files:
<html>
<head>
<script src="jquery.js" type="text/javascript"></script>
<script src="jquery.validate.js" type="text/javascript"></script>
<script>
$(document).ready(function(){
$('#contact_form').validate({
'rules':{
'name':'required',
'email':{
'required':true,
'email':true
},
'job_status':'required',
'comments':{
'required':true,
'minlength':10
}
}
});
});
</script>
</head>
<body>
<form id="contact_form">
<table>
<tr><th>Nama</th><td><input name="name" /></td></tr>
<tr><th>Emel</th><td><input name="email" /></td></tr>
<tr><th>Status Pekerjaan</th><td><select name="job_status">
<option value=""> -- Sila pilih-- </option>
<option>Tidak Bekerja</option>
<option>Bekerja</option>
<option>Bersara</option>
</select></td></tr>
<tr><th>Maklumat lain</th><td>
<textarea name="comments"></textarea>
</td></tr>
<tr><th colspan="2"><input type="submit" /></th></tr>
</table>
</form>
</body>
</html>
4. The files that are need to be included in the htm or html files namely jquery.js (download from jquery.com) and jquery.validate.js (jquery plug-ins downloaded from http://bassistance.de/jquery-plugins/ ) . Remember both files must reside inside the same folder as your htm or html file just now.
5. To run you file, just double click the htm/html file and then you will find out the astonashing result as shown below.

Wednesday, April 14, 2010
Customise CakePhp View Part 2 - Validation
We need to validate the data sent to the database so that it will be the correct,usefull and required by us and most important thing it will prevent spamming. To do the validation, and again using my example-please refer to the previous post, we could use the following steps:
1) Open syarikat.php file located in Models directory
2) Paste the following codes:

So, what do this code telling us-this question must be pop-up from your mind right now? Actually, this code validate the S_Name (1. the company name) and S_Email (2. the company email address) entered by users as shown below.
 If users entered data that are not in accordance with the condition stated by us, the following errors will be generated.
 There some other customizations that I have included in the code above. The first one is that I make my own error messages and secondly, in email field, where I have make a requirement that users need to enter a valid email and the users can also left it empty depends on the person choice. If I don't put the allowEmpty in the code, users are forced to enter their email address even though they don't have any email addresses to proceed to the next steps.
Thursday, March 11, 2010
Customise CakePhp View Part 1 - In My Case

As I said ealier, we can customise our CakePhp according to our own needs.
At the picture above, to remove the section that I have given the number 1 and 2. The following are the steps on how you can do that.
1. To remove 1, you need to create a ctp called default.ctp file and place it in app/views/layouts/
Example of a ctp file can be :

2. To remove 2, you need to change the value of 2 to 0 at line begins with Configure::write('debug', 2); to Configure::write('debug', 0); in app/config/core.php
You can find the meaning of the number in this file.
The end result of the CakePhp view will be as follows:

Monday, March 8, 2010
Simple CakePhp Application - Example
There are about three steps in doing this:
Step 1. Create a datebase and tables and dont forget to insert data into the tables->The name for the tables must be in plural form.
Step 2. Create a php file in app/models directory
- for example syarikat.php->the name of the file must be in singular form
- the code:
Step 3. Create a php file in app/controllers
- for example syarikats_controller.php ->the file name must be filenameplural_controller.php
- the code:
Note: the scaffold variable is use when there is no app/view .thtml file.
The scaffold variable automatically create index.thtml, add.thtml, view.thtml and delete.thtml
If you need to create your own view, process or layout, you can ommit the scaffold variable.
To access your application from browser (in my case)
type at your browser:
If your get this error (in my case):
Then, you must name your first field in the table as ID and make it auto increment.
Example when creating your database
The view of my first application from the browser

Of course you can customised this view according to your needs. For that, I will show to you all in the near future.
Step 1. Create a datebase and tables and dont forget to insert data into the tables->The name for the tables must be in plural form.
Step 2. Create a php file in app/models directory
- for example syarikat.php->the name of the file must be in singular form
- the code:
class Syarikat extends AppModel
{
var $name = 'Syarikat';
}
?>
Step 3. Create a php file in app/controllers
- for example syarikats_controller.php ->the file name must be filenameplural_controller.php
- the code:
class SyarikatsController extends AppController
{
var $name = 'Syarikats';
var $scaffold;
}
?>
Note: the scaffold variable is use when there is no app/view .thtml file.
The scaffold variable automatically create index.thtml, add.thtml, view.thtml and delete.thtml
If you need to create your own view, process or layout, you can ommit the scaffold variable.
To access your application from browser (in my case)
type at your browser:
http://localhost/cakephp/syarikats
If your get this error (in my case):
Notice (8): Undefined index: id
Then, you must name your first field in the table as ID and make it auto increment.
Example when creating your database
id INT UNSIGNED AUTO_INCREMENT PRIMARY KEY
The view of my first application from the browser

Of course you can customised this view according to your needs. For that, I will show to you all in the near future.
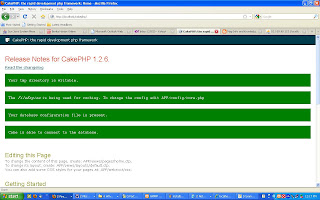
First Installation Page of CakePhp 1.6
This is the first page of CakePhp 1.6 after installation.

After the installation, you need to change following:
1. 'Security.salt' in app/config/core.php
2. Rename config/database.php.default to config/database.php
Please read the instructions on the first page to what need to be changed.
It doesn't really matter what the value of the 'Security.salt', as long as it's not easy to guess. You could use an online SHA1 hash generator tool to generate a new long key like what is there by default.
After these steps, you can directly access your database (provided you have set up your database before hand).
If you have successfully edited the files, you should get the following:

Wednesday, February 17, 2010
CakePHP 1.2.6 New Release
It is stated in the cakephp.org that the new release of cakephp 1.2.6 is now available for download. This release includes more than 160 commits improving performance and fixing more than 75 related tickets. Visit cakephp.org for details.
Subscribe to:
Posts (Atom)